- flutter
flutter - 친구 목록 radio button으로 선택하여 이동하기
나둥식
2022. 12. 20. 13:05
1️⃣ home_app_bar에 클릭 이벤트 넣어주기
@override
Widget? get title => Row(
children: [
InkWell(
onTap: () {
showModalBottomSheet(
//shape: RoundedRectangleBorder(borderRadius: BorderRadius.circular(50)),
backgroundColor: Colors.transparent,
context: context,
builder: (BuildContext context) {
return Container(
padding: EdgeInsets.only(left: 20, right: 20),
//위 패딩은 모달창의 터치 가능한 영역 내부 패딩
//height: elevation,
height: 320,
decoration: BoxDecoration(
borderRadius: const BorderRadius.only(
topLeft: Radius.circular(30),
topRight: Radius.circular(30),
),
color: Colors.white,
),
child: Center(
child: Padding(
padding: const EdgeInsets.only(top: 18),
child: Column(
children: <Widget>[
// SizedBox(
// height: 30,
// width: 50,
// child: Divider(
// height: 1,
// color: kchacholGreyColor(),
// thickness: 4),
// ),
Container(
width: 50,
height: 4,
decoration: BoxDecoration(
borderRadius: BorderRadius.circular(4),
color: kmidGreyColor(),
),
margin: EdgeInsets.only(bottom: 20),
),
Expanded(
child: Container(
width: double.infinity,
child: SizedBox(
height: MediaQuery.of(context).size.height / 2,
//어거지로 리스트뷰 높이 맞춤...
child: ListView.builder(
shrinkWrap: true,
padding: EdgeInsets.zero,
itemCount: userList.length,
itemBuilder: (context, index) => FriendsRadio(
userList.length,
user: User(
sender: userList[index].sender,
message: userList[index].message,
profileImg: userList[index].profileImg,
sendDate: userList[index].sendDate,
),
),
),
),
),
)
],
),
),
),
);
});
},
child: _homePage(username),
),
],
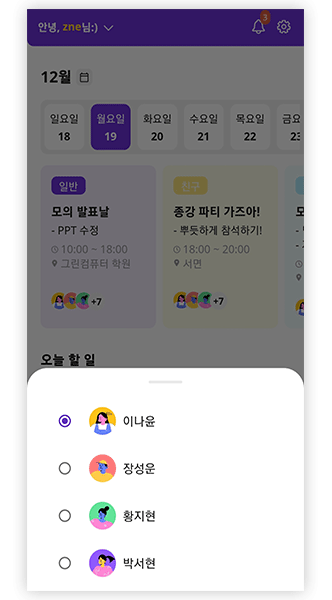
);① title 영역에 InkWell로 onTab 이벤트 넣어줌
② onTab하면 showModalBottomSheet 나타나기
2️⃣ Radio List 만들기
① 임의로 firends와 배열의 id값을 받아서 리스트로 구현해 줄 것임
enum Friends { name1, name2, name3, name4, name5, name6, name7 }➡ enum으로 Friends 목록을 설정하기
② _friends의 처음을 nam1로 초기화하고, user의 데이터 바인딩을 위해 userList 불러오기
Friends? _friends = Friends.name1;
final List<User> userList = List.of(users);
③ RadioListTile로 리스트 그리기
Widget _buildRaioList(Friends friends, int id) {
    return RadioListTile(
      value: friends,
      groupValue: _friends,
      onChanged: (Friends? value) {
        setState(() {
          _friends = value;
        });
        Navigator.pushNamed(context, "/friendPage");
      },
      title: _buildRadioListTitle(userList[id].profileImg, userList[id].sender),
    );
}
- value에 friends를 받아서 Friends enum의 순서 받기
- groupValue로 같은 그룹의 radio 버튼들끼리 묶을 수 있음
- ListTile 클릭 시 "친구 홈 페이지"로 이동하게 설정
④ RadioListTile 디자인하기
Container _buildRadioListTitle(String image, String text) {
    return Container(
      padding: EdgeInsets.only(top: 10, bottom: 10),
      child: Row(
        crossAxisAlignment: CrossAxisAlignment.start,
        mainAxisAlignment: MainAxisAlignment.spaceBetween,
        children: [
          Container(
            padding: EdgeInsets.only(top: 5),
            width: 40,
            height: 40,
            alignment: Alignment.center,
            decoration: BoxDecoration(
              borderRadius: BorderRadius.circular(10),
              image: DecorationImage(image: AssetImage(image), fit: BoxFit.cover),
            ),
          ),
          SizedBox(width: 10),
          Expanded(
            child: Container(
              padding: EdgeInsets.only(top: 8),
              width: 175,
              child: Text.rich(
                textAlign: TextAlign.left,
                overflow: TextOverflow.ellipsis,
                maxLines: 1,
                TextSpan(
                  //text: 'Hello ',
                  children: <TextSpan>[
                    TextSpan(
                        text: text,
                        style: textTheme(
                          color: kPrimaryColor(),
                        ).headline3),

                  ],
                ),
              ),
            ),
          ),
          //_buildFollowBtn("follow"),
        ],

      ),
    );
  }
3️⃣ RadioList에 userList의 data 바인딩하기
Expanded(
  child: Container(
    width: double.infinity,
    child: SizedBox(
       height: MediaQuery.of(context).size.height / 2,
       child: ListView.builder(
         shrinkWrap: true,
         padding: EdgeInsets.zero,
         itemCount: userList.length,
         itemBuilder: (context, index) => FriendsRadio(
           userList.length,
           user: User(
             sender: userList[index].sender,
             message: userList[index].message,
             profileImg: userList[index].profileImg,
             sendDate: userList[index].sendDate,
           ),
          ),
        ),
      ),
    ),
)
➡ 현재는 profileImg와 sender만 넣어주었음